Wednesday, December 27, 2017

Creating a great fruit and cheese plate

When it comes to making a fruit and cheese plate, there are many options. The following are a few things to consider when putting together your plate.


How much fruit and cheese to buy

Before you decide which cheeses and fruit to buy, you need to know about how many people you’ll be feeding. You should also know what else is on the menu. Is the cheese and fruit plate the only appetizer or one of many? Most experts recommend 1 to 2 ounces per person.


How many varieties

Deciding how many varieties is a purely personal thing. Some people like to offer just one special cheese, while others prefer three to five different types. Let your personal tastes and budget determine what you want to offer. A good rule of thumb is that if you are incorporating several different cheeses, it is wise to mix hard and soft varieties. 

Avoid cheese that is too pungent; it can overwhelm the more subtle varieties.


I like to go to Whole Foods where they will let you taste the cheeses. This guarantees that you will love what you buy and you don't have to stick to ones you know and love, you can experiment.


Types of fruit

Using fruit that is local and seasonal is a safe bet. If it’s spring, add strawberries. Use watermelon in the summer and apples in the fall. You can always supplement with grapes, which are good in almost any season. Pears are also almost always available.

Try to choose fruits that won’t darken or that can hold up to being exposed to air for an hour or more.


The Plate

While the plate itself isn’t as important as what you put on it, you will want one that is appropriate for the occasion. If the event has a theme, by all means, match your platter to the theme or occasion. Some suggestions include using a melamine tray found at discount stores and available in colorful styles and shapes.

If the event is more formal, a silver or crystal tray may fit the bill. Or, use a cutting board, which actually is a great choice since it allows guests to slice the cheese easily.


Utensils

Be sure to have a cheese knife for every cheese, tongs, forks, cocktail picks and napkins available for guests to help themselves with.


What to include

You might pick one country and feature their cheeses. Or, you might introduce your guests to a variety of cheese from goat and sheep milk in addition to cow’s milk. A mix of hard and soft is always appropriate for every occasion.


Specific combinations

~Cheeses of France: include a Brie, a Camembert, and a Comte. This gives you a soft, a hard and a fragrant. Small slices of French bread, bright red strawberries and grapes will make a perfect presentation.

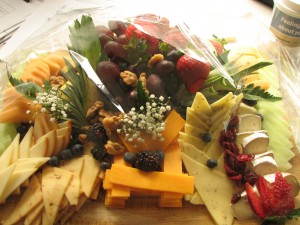
~Cheddar plate: You can create an international cheddar platter with varieties from the United States mixed with those of England and Ireland. Cheddar goes perfectly with apples, which apple pie fans have recognized for a long time.


The possibilities are endless, let your tastes and imagination be your guide. The beauty of a cheese and fruit platter is that it requires little attention once it is put out. Just replenish anything that is popular and let the guests enjoy themselves. 


A fruit and cheese plate is safe on the counter for several hours unless it is very warm. If the weather is too warm, refrigerate until the last minute.

Wednesday, December 20, 2017

Great baking with yeast

Baking with yeast is intimidating for many new bakers. Even some seasoned cooks are not quite sure how it works or how to use it. There really are no secrets to baking with yeast but there are some techniques that will guarantee that you will have a great product every time you bake.

Choosing the yeast

Yeast is a microscopic fungus. It comes in several forms but the average kitchen baker will most likely use active dry yeast. This is dissolved in warm water to activate. This comes in single serve envelopes which are usually attached in a strip of three or in a jar from which you measure your serving.

Yeast may also come in a cake which can be crumbled into dry ingredients or dissolved in tepid water.

There is also rapid rise dry yeast which makes the bread rise twice as fast. If you know that you will be in a rush, this can be the perfect option. If you are using a bread machine, there is yeast that works specifically with your machine.

If you need more information, Fleischmann’s Yeast has a very explanation on their website along with some great recipes. No matter what type of yeast you choose, be sure to check the date on the package. If the yeast is past its usage date it may not produce the results that you are expecting.

For most recipes, the active dry yeast is a good option. For novice bakers, it is a good idea to have a thermometer so that you can melt the yeast in the correct temperature of water. After a while, you will be able to check the temperature on the inside of your wrist but when you are just starting out it is best to follow the directions exactly. If you don’t and your recipe fails, you may not be able to determine exactly what you did to cause the failure.

Choose a recipe

Start simple. Look for a recipe that has been created for beginning bakers. There is a learning curve with baking and using yeast and as you gain experience and confidence, you can expand into more creative recipes but a good pizza dough or white bread is a great place to start or if you have a sweet tooth, cinnamon rolls are also simple and delicious.

Kneading

Most baked goods that are made with yeast require kneading. It really is not difficult but it takes a little time to get the feel of the dough and to understand when it has reached the level of elasticity that you want. You are basically going to turn the dough out onto a table or board and press down on it with the heel of your hand. You will then pull the dough over onto itself and press down again. You will turn the dough, press it and fold it and then turn it over and begin again. You will notice when the texture of the dough begins to change.

Raising

Yeast needs to expand. After kneading you will place the dough in a bowl, cover, place in a warm place and leave it to double in size. Some recipes require that when it has doubled, it needs to be punched down and rise again. After the second rising, the dough is ready to be formed and baked.

As you can see, there really is no secret to using yeast; it just requires a little work and lots of patience. 

The results, however, make it all worthwhile.

Related articles:
Pans every baker needs

Tuesday, December 12, 2017

Candy you can make without a thermometer

Let’s face it; unless you have been making candy for years, you are going to want to use a candy thermometer. Even though your grandmother and countless generations of cooks before her never had access to one and still managed to prepare batches of sweet delights, that doesn’t mean that you want to go down that road. However, there is some candy you can make without a thermometer.

There are reasons why you might need to make candy without a thermometer. Maybe you don’t own a candy thermometer or maybe yours just broke and you don’t have time to replace it. Whatever the reason, once you understand what the hard/soft ball stage is you will be able to produce many sweet treats without having to resort to your mercury helper.


Cooking sugar

When you are cooking sugar, it goes through several stages. When a small amount of the mixture is dropped into a cup of cold water it hardens up. How hard it gets determines which stage it is at. If it flattens out in the bottom of the cup it is way soft, if it turns into a brittle ball it is probably overcooked. You need to learn what a softball is and what a hardball is. It’s that simple.

Fudge

One of the simplest things to make without a candy thermometer is fudge. Fudge comes in a great many varieties from fudgy chocolate to luscious flavors like peanut butter and the seasonal favorite pumpkin. Fudge can be made without or without resorting to cold water and testing the hardness of a ball of sugar. I prefer this method since it makes the sort of fudge that my mother made but many recipes use other easier methods including using marshmallow.


Peanut brittle

Another simple candy to make without a thermometer is peanut brittle. All it requires is peanuts add sugar, it is that simple. It doesn’t have to be just peanuts either, how about walnut or almond brittle or the family favorite, pistachios. The nuts are so good for you that you can even convince yourself that this is a somewhat healthy snack and in moderation it is great.

Pralines

When looking for recipes to make candy, it is easy enough to find ones that combine both the temperature that the mixture needs to reach and the ball stage. Once you understand what temperature represents softball stage, you can adapt recipes yourself.

Pralines are the next level of candy to try, more ingredients and a little more difficult but still easy enough for a beginner to tackle. Just follow the recipe as closely as possible for the best results.

These are just a few of the many delicious candies that you can make even if you have never owned a candy thermometer. But as a side note, owning one does make your life a lot easier and is well worth the investment if you want to try lots of candy making.

Wednesday, December 6, 2017

Slow cooked short ribs

I love short ribs, I have, however, never made then at home. There is something just so luscious about this fall off the bones meal. Luckily, I found a package of short ribs for $5 off and decided this was my chance. It was about a pound of short ribs.

I looked at a recipe on my phone for short ribs to get myself off on the right foot. As I suspected, browning the ribs before throwing them in the slow cooker was the way to go. Being me, I didn't measure anything at this point. What I did was put flour, garlic powder,  salt and pepper into a ziplock bag and added the ribs one at a time. If I had to estimate, I would say 1/2 cup flour 1 tsp salt and 1/2 tsp pepper and 1/2 tsp garlic powder.

I browned the ribs in a combination of butter and olive oil.

When they were all browned I add them to the slow cooker. I made the cooking sauce with two cans of stewed Italian style tomatoes, 1 can beef stock, 2 Knorr beef stock tubs, tsp garlic pepper sea salt, and 1 tablespoon of Worcester sauce.

I cooked this for hours on high, I would say 6-7 hours. The meat was fall off the bone tender. In the last 15 minutes I used Wondra to thicken the sauce, I used several teaspoons.

I served this over mashed potatoes. The sauce was so good that I saved the left over to use again, we both loved it. The four ribs were enough for the two of us. I had to rush out after dinner and I forgot to take a picture of the final product but I can tell you it was amazing.

Wednesday, November 29, 2017

Old fashioned apple cider doughnuts

Homemade doughnuts are easy to make. You don’t need any special equipment, you just need a frying pan deep enough to hold an inch or an inch and a half of very hot oil and a candy thermometer. The fall is the perfect time for homemade old fashioned apple cider doughnuts.

The recipe that I have always used for doughnuts is not one that I created but rather one that I adapted. I got the original from my Betty Crocker Cookbook shortly after I got married in 1968. I have modified it a little but it is just about the most perfect old fashioned style doughnut you would ever want to make. what I mean by old fashioned is a non-raised doughnut, there is no yeast in this recipe. I used to make this recipe for my children especially in the fall, for some reason in our house Halloween and fresh homemade doughnuts seem to go hand in hand. 

I now have a whole new generation of children to delight with homemade doughnuts and they certainly enjoy being allowed to help by cutting out the doughnuts. I never allow them anywhere near the hot oil but they love to help with the cinnamon sugar after the doughnuts have cooled.

Apple Cider Doughnuts

  • 3 cup flour
  • 1 cup sugar
  • 3 tsp baking powder
  • 1 tsp salt
  • 1/2 tsp cinnamon
  • 1/4 tsp nutmeg
  • 2 tablespoons shortening
  • 2 eggs
  • 1 cup apple cider ( if you don’t have cider use milk)
  • Vegetable oil for frying

    Coating

  • 1/4 sugar
  • 1 tablespoon cinnamon
Mix the flour with the baking powder and salt. In a large bowl mix the eggs, sugar, and shortening with an electric mixer. Add half the flour mixture and beat. Add the spices and the rest of flour. If it gets too thick use your hands to turn it out onto a floured board. Knead it lightly. Roll it out with your rolling pin. Don’t roll it too thin, you want chunky doughnuts.
If you have a doughnut cutter, that is perfect but if you don’t have one don’t despair. All you need is a glass and a pill bottle. The glass is the doughnut and the pill bottle the hole. Follow the same directions for the glass and pill bottle as you use for the doughnut cutter.

Dip your doughnut cutter into the flour and start cutting doughnuts. Keep dipping it into the flour every few cuts so it won’t get stuck. Let the doughnuts sit while you get some oil, about 1 to 1 1/2 inches deep up to 375 degrees in your pan. Use your candy thermometer to determine the correct heat. If you don’t have one you can test the oil with the doughnut holes to make sure they don’t brown too slowly or too quickly.

Carefully place the doughnuts into the fat, I like to use a long handle fork to avoid getting burned. This will also help you turn the doughnut when it has browned. Have a plate prepared with paper towels so that you can absorb the grease from the doughnuts.

Allow to cool. These are very good plain, they are even better tossed in some cinnamon sugar. Serve these with a glass of apple cider on a cool fall day and impress your family and friends.

I save the oil in a jar to reuse, once you try these you will want to make them again soon.

Wednesday, November 22, 2017

Homemade pizza dough

I grew up on homemade pizza, my mother was an expert. I am not quite sure where she learned how to make it probably from one of her Italian friends but I do know that she and my Uncle Jerome had a competition of sorts about who made the best homemade pizza. lol In my opinion, who cares, both of them were great. 

Making homemade pizza dough is so easy, you are going to be asking yourself why you haven’t tried this before. This is a very easy dough recipe that requires absolutely no skill to make. The proof is that I can do it at a moment’s notice.

  • 5 cups of white flour, it does not need to be sifted
  • 3 teaspoons salt
  • 2 cups warm water
  • 2 packs of dry yeast
  • 2 tablespoons of sugar
  • 1/2 cup vegetable oil or melted Crisco
Measure the flour and the salt and add them to a large mixing bowl. Put this to the side.
In a two cup measuring cup add the warm water, it should feel warm, not hot when you test it on your wrist. Measure the sugar and add to the water. The yeast goes in last and just stir lightly. When it has dissolved completely add slowly to the flour mixture and blend, I use a large wooden spoon. The oil goes in last and this is a good time to get your hands into the mix.

Turn the dough out onto a floured board and start to knead. You will want to work this dough with your hands until it has developed elasticity. There is an art to kneading, press down on the dough with the palm of your then pull the dough over the indentation you made with your palm. Keep rotating the dough until it is well mixed. This will take between five and ten minutes. Think of it as culinary therapy. I love kneading dough; it allows me to work out a lot of frustration. Add more flour as needed to keep the dough from sticking to the board.


If it is a cool day, set your oven to 250 degrees long enough to get warm then shut it off. You want your dough to have a nice warm spot in which to rise. Pour a little olive oil into the bowl and coat the bowl well. Put the dough back into the bowl and rub the top of the dough with a little additional olive oil. Cover the dough with a clean dishtowel. It should be kept out of drafts. which is why I like a just slightly warm over.


Let it rise for an hour or two, then check on it. When it has doubled in size punch it back down and let it rise again.


When it has risen a second time it is ready to start making your pizza.


Split the dough in half, put one piece aside, take the other piece and roll it out on a floured surface. I use my wooden cutting board but any clean, floured surface will do. Your crust should be about an inch and a half bigger then you pan on all sides. If you are using a pizza pan, lightly cover it with olive oil. If you use a pizza stone, this step isn’t necessary. Roll the edge of the crust back to make a higher edge, this gives the crust it nice high rim.


I make a very simple sauce for my pizza:
  • One large can of tomato puree
  • 2 teaspoons dried oregano
  • 1-teaspoon garlic powder
  • A splash of olive oil
Spread a thin coat over the pizza with a large spoon. Add thinly sliced onion and green peppers, arrange ground beef or Italian sausage on top and cover with handfuls of mozzarella and cheddar cheese grated and mixed. I worked at a pizza parlor as a teen and this is the cheese combination they used. Add a little olive oil over the top and you are ready for the oven.

Repeat with the second piece of dough.


Bake your pizza in a 400-degree oven for twenty to twenty-five minutes or until your crust is golden brown.


This recipe makes two good size pizzas.


Preheat the oven to 425 degrees


This same dough can be used to make schiacciata. When my children were young this was one of their favorite meals.

  • 1 pound sweet Italian sausage
  • 1 can sliced potatoes
  • 1 can stewed Italian style tomatoes
  • 1 cup fresh grated mozzarella cheese
Squeeze the sausage out of the casing and into a lightly greased frying pan and saute until brown. Open the cans of potatoes and tomatoes. Drain both of them, really squeeze as much water out of the tomatoes as possible. Drain the sausage and mix it with the potatoes and tomatoes.

Roll out half of the pizza dough. Place on a greased pizza stone or pan. Spoon the mixture onto half of the dough cover with the cheese. Flip the other half over the mixture and seal the edge.


Cook in the oven for 30 minutes.


Take it out of the oven, cut into slices and serve it to your adoring family. They will be hard pressed to believe that you made this all by yourself from scratch. Only you will know how very easy it was.

Wednesday, November 15, 2017

Creating a sourdough starter

A good sourdough starter is a thing of beauty, and creating a sourdough starter has almost reached mythical proportions. There was a time when it was a popular thing to have one whose name was Herman growing in your kitchen. Herman was the base for a variety of delicious cakes and bread.

The idea was that Herman grew and then you shared Herman with your friends. At one point in the 70s there were no more friends to share Herman with and he died out, at least in this writer’s neighborhood. It seems that Herman is still alive and well and helping cooks create delicious baked goods.

To welcome Herman to your home you have two choices, you can receive Herman from a friend or even order him on the Internet or you can create your own Herman. To make your own Herman you don’t need very much. Herman has a simple base of 1 cup of flour, one cup of milk and ½ cup sugar. The milk needs to be warmed to at least 110 degrees and then combined with the other two ingredients. Choose a bowl that you are not going to miss and make sure it is a lot bigger than the original ingredients.

Once the ingredients are all combined mix them together until the mixture is smooth. Place a clean dish towel over the bowl and set it in a warm location, at least 70 degrees is up to 80 is ideal. It is now a game of watch the mixture ferment. Don’t leave the mixture alone, it will enjoy your company, stir it often. What is happening is that yeast will begin to develop and this is where the fun starts. It is also possible to start Herman with yeast which gets the process going faster.

It can take two to three days for the process to get to the point where you need to start feeding Herman. On day four give Herman a cup each of flour, milk, and sugar. Stir for the next four days and then on day 10, feed Herman again. It is now time to start to bake with Herman and at this point, you may also want to start giving away some of the sourdough starter to some of your friends.There are many things that you can bake with sourdough starter, bread, cake, muffins, and bars.

A favorite recipe is called the Friendship Cake and the recipe is usually given with Herman when he is shared with friends. If you end up with more starter than you can easily use, you can freeze the starter and it will become dormant. The 10-day process for Herman continues for as long as he is alive and well on your counter so he will grow at quite an alarming rate. It is a good idea to really enjoy baking or to have a very large circle of friends when you decide to have your own sourdough starter.


Additional reading:

Wednesday, November 8, 2017

Oven roasted beef brisket

Brisket is one of the toughest and most flavorful cuts of beef. It lends itself well to corning, which we all know, and goes great with cabbage. In order to make an oven cooked beef brisket, it should be cooked slowly to allow the connective tissues in the meat to break down. 

This cut should have plenty of fat to baste the roast as it is cooking so choose your piece of meat accordingly.

4 pounds of brisket
1/4 cup olive oil
1 onion sliced thin
2 bay leaves
2 teaspoon salt
2 teaspoons ground black pepper
2 cups beef stock
2 cloves of garlic whole
5 red potatoes cut into 4 pieces
4 large carrots cut into 4 pieces each
2 small purple turnips cut into chunks
2 parsnips cut into chunks
1 sweet potato cut into pieces


Place the roasting pan on the stove burner at medium heat. Add the olive oil and meat and brown the brisket on both sides. Browning adds a lot of flavor to the meat and makes it a more attractive color as well. Add the next five ingredients into the pan and cover tightly with aluminum foil. Place in a 325-degree oven for 2 hours.

Raise the temperature of the oven to 400 degrees, place the vegetables in the pan and replace the aluminum foil back on tight. Cook for an additional half hour and then remove the foil. Cook for an additional 30 minutes. This is important to give some color to the vegetables. Remove the pan from the oven and let the meat rest for five to ten minutes.

Take the brisket out and slice at an angle. 

Put the meat on a large platter and arrange the vegetables around the meat. Pour any juice that is left over top and serve. You can deglaze the pan with red wine if you enjoy that in your sauce. If you want your sauce to be a gravy you have two options. First, you can flour the brisket before you brown it or you can add flour to the sauce to thicken it. Either works, it is simply a matter of personal taste.

With long slow cooking, the beef brisket should be literally falling apart. This is a meal that is perfect for a fall or winter dinner with it long-cooked flavor and all the nutrients supplied by the vegetables. It is as comforting as it is delicious. It is also economical and can feed a large family.

Wednesday, October 25, 2017

Gourmet food gifts that are sure to please

Food and gourmet gifts are always popular and even more than at the holidays when there are many people who may not be able to afford to purchase these items for themselves. There are some food gifts that are practical, some that are great for families and some that are just indulgences. 

Food and gourmet gifts are as much fun to give as they are to receive. These gifts are also wonderfully easy to give, a few clicks of your mouse will have all your gift orders scheduled for holiday delivery. Imagine the look of joy on the face of the recipients when these gourmet delights arrive.

Practical Food Gifts

If you are looking for a food gift for your meat-loving friends, a package of great steaks from Omaha Steaks will be well received. You can also go with Kansas City Steaks or Corky's Ribs.

If you are looking for a little more healthy option, Harry and David offers fruit baskets for families and singles in a variety of sizes. You can choose to order just one box or a year full of delicious fruit. These are not just your average fruits either; they sell  perfect examples.

For the gourmet chef, why not choose a selection of spices in a pretty gift box from the Spice House This is a gift that will keep on giving all year long. How about a delicious selection of jams and jellies or chutneys from Stonewall Kitchen. These will certainly be very welcome gifts. If you are sending your gift early they even offer a gingerbread house kit that will be a wonderful gift for your favorite family. 

Families

A great food gift for a family is a bag or basket from Wolferman's.  This can include their signature English muffins, breads, desserts, jams, and jellies. They have little muffins, standard size, and giant and they come in a wide variety of flavors.

A coffee basket from  Green Mountain Coffee can come with Ghirardelli Hot Chocolate and they also offer tea choices. The Popcorn Factory has gift ideas set and ready to go for the holidays. What a great family gift along with a movie.

Indulgence

When it comes to indulgences, brownies rank right up there. The Food Network has named  Sugardaddys the best of the best after they won a throwdown against Bobby Flay. These luscious beauties will impress anyone. You can go brunette or Blondie, nutty, minty or spicy, they have it all. This is a totally indulgent gift for someone who will appreciate a "couture" brownie.

When you think gourmet chocolate the Belgian chocolate, Godiva comes to mind. They have expanded beyond just their signature truffles and filled chocolates to include cakes, cupcakes, brownies, and cookies. Deliveries can be scheduled to arrive just in time for the holidays.

Want to send a gift of gourmet cheese, truffles or caviar? You can find it all at this one-stop gourmet food store.  

The Gourmet Food Store has cheeses from around the world and will make up baskets with whatever you choose.

Fortnum and Mason, the London cornerstone, has been offering wonderful food hampers for all occasions for as long as anyone can remember. You can have a gourmet picnic basket packed with every indulgence you want to include.

Food and gourmet gifts are one of the most popular gifts to give and to receive, Christmas is no exception. If you prefer to pack your own gifts you can order pieces from most of these retailers or just use their packages as a template for making your own.

Wednesday, October 18, 2017

Confessions of a habitual cookbook collector

At some point, the exact year escapes me, I joined a cookbook club and suddenly I had four new cookbooks, which soon multiplied to eight and twelve since I was terrible at returning the cards on time. What I realized somewhere along the way was that I enjoy reading cookbooks. This began my next phase of collecting. I enjoyed reading about Southern cooking, Shaker cooking and cooking at The White House.

Celebrity recipe favorites soon joined my collection. Everywhere I went I looked for a new book to add to my collection. In 1995 we had a catastrophic house fire and I lost most of my cookbooks, I was devastated, years of collecting went down the tubes. At some point, I realized that by haunting antique stores and flea markets, I could replace many if not all of my cookbooks. One that I have never replaced is my 1890′s White House Cookbook.

In the past nineteen years, I have gone on to a whole new phase of cookbook collecting as we changed our eating habits. During the Atkins years, it was all about meat and Barbara Kafka’s Roasting Cookbook offered me many ways to make my meat taste really good. All my baking cookbooks became strictly reading material, and I added several slow cooker books to my hoard.

The Atkins years are over and I revel in my collection of cookie, cake and bread books. I love reading Jim Fobel's "Old Fashioned Baking Book" and "Just Like Grandma used to Make" by Lois Wyse. Natalie Dupre sold me on Southern Cooking long before Paula Dean made it a household word. Every vacation was an opportunity to pick up a new cookbook.

A trip to Vienna gave me "Imperial Austrian Cuisine" by Renata Wagner Wittula. Our cruise to Bermuda added "The Royal Caribbean International Cookbook". My all-time favorite cookbooks for actually cooking are "50 Ways to Cook Anything" and Good Housekeeping’s paperback "Cooking with Susan". I still love to read "Cooking for Madam" by Marta Sgubin about her years cooking for Jackie O.

As we were getting closer to retirement I began trying to downsize. I can’t stop collecting cookbooks but I have made a deal with myself. If one comes in, one must go out. It makes me think really hard about adding a new book, which old book will I part with. Luckily I have several by authors who will remain unnamed that I am happy to see go. I have fallen victim to impulse buying and realized after the fact that these books add nothing to my collection.

How many cookbooks do I have? Several hundred I am sure and while I don’t expect the collection to grow I know it will evolve. The wonderful thing about cookbook collecting is that it is a reflection of our own personality. It is also very affordable, you don’t have to be wealthy to have a fantastic cookbook collection as a matter of fact if you buy second hand or from discount shelves, it can be very inexpensive.

Collecting cookbooks doesn’t take any special knowledge, you don’t have to spend a lot of money and you can start slow and add on as you find your favorite author or type. Maybe you like baking cookbooks, there certainly are plenty to choose from. You might want to start with A Passion for Baking by Marcy Goodman. The sky is the limit. If you want older books you can search second-hand bookstores or antique stores. For new books, Amazon has an amazing variety as does Barnes and Noble.

No two people will ever have duplicate collections. Let friends and family know you enjoy cookbooks and they will turn up among your Christmas and birthday gifts. Becoming a cookbook collector can become an obsession, a delicious one. All you need is the space to store your collection.

Wednesday, October 11, 2017

Jam n Eggs Glens Falls New York

Jam n Eggs in Glen Falls New York offers breakfast and lunch daily. We stopped in on a Tuesday morning in late August and it was quiet at 9:30 a.m. What attracted me to this restaurant was the fact that they offer Eggs Benedict and reviews of the restaurant claim that it is the best that diners have ever tasted. Who could resist that? Not me.


I did order the eggs Benedict and while the hollandaise sauce may not be quite as good as the one at Max Amore, which I personally think is the best in the world, it was a very good benny. What I did like was that they serve it with ham as opposed to Canadian bacon and it was much more flavorful than the Canadian bacon. The poached egg was cooked perfectly and the yoke added the lusciousness that one expects from a benny. The homes fries were very good as well.


Al ordered the regular stack of blueberry pancakes. These three behemoths were double the amount that he could eat. They were well loaded with blueberries and had some serious depth to them. Flavor was excellent and he took the leftovers with him to eat the next day.


Joe had fried eggs and toast and the eggs were perfectly cooked. With our coffee, juice and hot chocolate, we had plenty of food to fuel our morning of travel. A very good breakfast for sure.

#jamneggsglensfalls

Friday, October 6, 2017

Bravo an American Bistro Providence RI

I have been eating at Bravo for years. It was for many years, my go-to restaurant whenever I was in Providence. Then, as often happens, I stopped hanging out in Providence. There is really no reason for it, things just happen. Now, the only reason I go to Providence is to attend the NERGC or a performance at the Providence Performing Arts Center. 

On September 24th Kasey and I went to attend a Sunday matinee performance of Les Miz. We wanted to grab lunch before the shoe and I remembered Bravo. It is only 4 or 5 blocks from the theater and if we were lucky enough to find on-street parking, we would save the $20 it costs to park near the performing arts center. We found a spot right across the street from Bravo. 


I should have made reservations but I didn't. It was very busy and without reservations, we had a choice of at the bar or a high-top table in the bar, we chose the high top. Our waitress showed up relatively quickly but as I said, it was very busy. 


On Sunday brunch is served and usually, I have breakfast here but today I decided to have a turkey club sandwich. Kasey had a chicken sandwich. I went with the homemade fries which are wonderful and Kasey opted for the greens which she also loved. 


My sandwich had carved turkey, cranberry mayo, bacon, melted Havarti cheese, and lettuce. It was delicious and I ate every bite. Kasey also cleaned her plate. She had a glass of Pino which she said was excellent. We were both delighted with our food and the general atmosphere. I have never been disappointed with my food here and we will be returning the next time we are in town for a show. 


The next time you are in Providence I highly recommend giving Bravo a try. 

Wednesday, October 4, 2017

Cape Ann Brewing Company, Gloucester, Ma.

Located on Rogers Street on the waterfront, the Cape Ann Brewing Company has a great location. A parking lot is located next door and if you are lucky, you will get a spot. This writer was not lucky and ended up parking in a bank parking lot down the street.

Several other parking lots are located in the area and with a further acquaintance with the neighborhood, this became quite evident. Seating is communal at this restaurant. If it is quiet, you will not need to share your table but if it gets busy, be prepared to make new friends.

The menu offers a wide selection of choices from the ever-present fried fish platters to sandwiches, salads, and appetizers. When asked what dishes no one should leave the brewery without having tasted, the waitress suggested the fish tacos and the steak bomb. 

These were promptly ordered along with stuffed clams and a Caprese salad appetizers.

Since the beer is brewed on site, there is a good selection of brews on offer and one of the seasonal ones was the Sunrise Saison. It has notes of strawberry and rhubarb and is certainly an appropriate choice for early summer. It is a light golden color and there certainly is a slightly fruity taste which is both delicious and refreshing. Don’t be afraid of the rhubarb, there were no sour overtones.

The stuffed clam appetizer included linguica in the stuffing. It was not as prominent as expected and the clams were okay but nothing special. The Caprese salad, on the other hand, was excellent with fresh tomatoes, mozzarella cheese, diced black olives and capers and balsamic reduction. The appetizer portions were not huge, there were four clams and five slices of tomato but there was enough to share.

The steak bomb is a huge portion. The roll was so overstuffed that it was awkward to try to pick up. There was loads of steak covered in melted cheese. In addition, the plate had a large portion of French fries, coleslaw, and a very delicious pickle. The fish tacos are also a very successful dish with a fried fish tender covered in salsa and corn and sitting on top of a portion of guacamole. The serving is two tacos and with the addition of French fries and coleslaw was more than enough to satisfy. The coating on the fish was light and there was aioli available to add any additional flavor that you need.

Cape Ann Brewing Company is the perfect place to come for a good time. The atmosphere is casual and the service was excellent. The noise level is quite high so not a good place for quiet conversation but for a great beer and a casual nosh, the location is ideal for enjoying the waterfront. The clientele was varied but families and children were mixed in with tourists and locals.

Wednesday, September 27, 2017

Craft on 9 South Glens Falls New York

The exterior of this bar/restaurant does not give any indication of the charm that you will find inside. The menu is eclectic, and what was particularly interesting was that most meals are offered as a full portion and a half portion. The best part about this place is that everything sounds so good that making a decision is hard, very hard.

Al decided to have a half portion of the flank steak, served with broccolini and their homemade fries. Joe had a half salad and a grilled shrimp over seafood risotto. 

I decided to have the Kalamata and green olive tapenade which I loved and chicken wings. The tapenade was served with crostini and gave me three servings. The tapenade just got better with age and I enjoyed it to the last drop!! The wings are breaded which surprised me but they were a very tasty garlic parmesan and it was a generous serving.

Service was excellent, they offer a menu of about 15-20 craft beers, Al had the Pilsner. The beer menu changes so what we saw won't be what you see. 


We were very pleased with our meal at Craft on 9 and while it wasn’t inexpensive it was excellent and we would all love to eat here again. Sonny recommended this restaurant to us and it made us feel safe listening to his recommendations. 

Tuesday, September 26, 2017

Sausage and peppers in the oven

I thawed out some Italian sausage and then realized that it was hot and humid and the last thing I wanted to do was to stand over a hot stove. I googled sausage and peppers in the oven and found out that it was possible to make them that way. So that became my mission today.


What you need:

1 pound of Italian sausage of your choice

1 large green pepper

1 medium onion


Preheat the oven to 350 degrees.


I first cut the sausage into pieces, mine was in the rope form. I washed and seeded the pepper, sliced it, peeled and chopped the onion. I placed everything into a bowl and added my season sea salt with garlic and pepper, about a teaspoon.


I then added olive oil about two or three tablespoons. Toss it all together until everything is well coated. Place on a sheet pan.


I used the oven shelf in the middle. The original recipe called for cooking it 20 minutes, I cooked it 40 minutes and it was just perfect.